

Using your Alde hydronic heating system in Spring
Welcome to another edition of our seasonal guides to your Alde hydronic heating system. In this piece, we’ll be guiding you through the steps of a pre-delivery inspection (PDI) to ensure you’re supplying your customers with fully functioning Alde heating systems.
Step 1 - Check the fluids
The heating system won’t work without heating fluid, so you must make sure that the system is fully topped up. When cool, the fluid level in the expansion tank should be 1 cm above the minimum marking.
Using your ethylene glycol hydrometer, you can test the fluid. You can also check its smell and appearance to verify its condition – if it smells fishy or looks turbid, your fluid needs replacing.
If you can’t verify the fluid, you should replace it no more than two years after the system’s build date. It should be replaced with an Alde-approved product. Alde-approved products include:
- Alde Premium G12 EVO Antifreeze


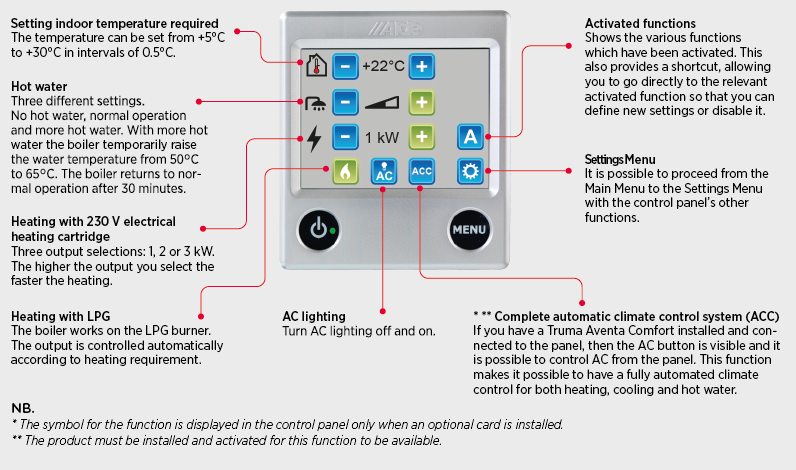
Step 2: Testing the central heating
When testing the central heating, you should test the electric heating first. If you have a touchscreen panel, the buttons should respond within three touches. Using your control panel, set the gas to Blue (off), and set the hot water to Normal. Then, follow these steps:
- Set the room temperature to 30 °C. The circulation pump icon should appear in the top left of the screen.
- The electric plug icon should be displayed in the top right of the screen. If not, this means the boiler isn’t in a complete 240 VAC circuit. Check the wiring for loose connections or damage.
Test on 1 kW electric for eight minutes and then 2 kW electric for four minutes. You should see an increase of a few degrees in the glycol temp on the screen after a short while.
Step 3: Testing gas heating
You must set the electric to 0 kW before beginning the test of your gas heating.
- Check the flue hoses at both ends of the system are secure and undamaged.
- Set your gas heating to Green (on). As the system is very quiet, you’ll need to feel for warm exhaust gas around the outside of the flue cap. Leave it for 12 minutes, and then touch the return pipe to the boiler to see if it’s hot, which it should be.
Alde Compact boilers are extremely efficient, and burn very cleanly; the flue gas analyser should show a 0.0008 CO/CO2 ratio, and there shouldn’t be any soot or steam coming from the flume.
Step 4: Pre-fill check
Before filling your system with water, you may need to descale the red/hot water connector. In the UK, you can use Clean Tabs D-Scale, and you can sterilise the fresh water system with Clean Tabs Puriclean.
Step 5: Check for leaks
This step is self-explanatory; check for leaks around the system, particularly push-fit fittings. If it’s leak free, the system is good to go!
If you have any further questions about PDIs for Alde heating systems, or if you have any general queries, please contact us today and we’ll be happy to help.
Warm regards, Alde


